If any of you have kids then you definitely have toys all
over the place! We have a 3 year old and 1
year old girls and the toys are out of control.
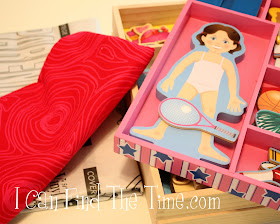
My oldest has recently started getting dress up dolls and
she loves them. I'm glad she is getting
into more 'story telling' types of toys, but the small pieces are such a mess. And they come in these cute wooden storage dishes, but they are not at all practical and the pieces are constantly spilling all over the
place. Not to mention how potentially dangerous this is now that
Baby-zilla is roaming around and loves to put everything in her mouth. So I had to come up with a way to store her
dress up dolls that kept them away from the baby, but allowed my 3 year old to
still play with them. My solution is:
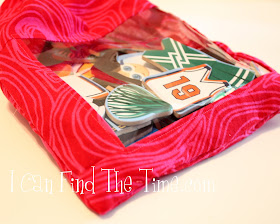
Toy Storage Bags with Plastic Windows
I love this idea for her dress up dolls, but it could be
adapted for any type of toy. And since
you can make any size bag the options are endless!
Here the supply list:
Fabric
Plastic sheeting/fabric
(I got mine for $2.79/yd at Hobby
Lobby in the home décor section)
elastic or cording
sewing supplies
First you'll have to decide what size bag you'll need. I just measured the doll in this play set and
added about two inches to the height.
It's not an exact science so just go with what works for your toys. Here is the drawing I made of the bag I wanted to make to make sure I cut the right sized pieces.
I choose to place my plastic window toward the bottom of the
bag so you could clearly see all the dress up pieces that come with this
toy. You can place it anywhere you'd
like based on the toy you are working with.
Next, you'll need to cut the fabric and plastic. Based on your measurements you'll need one
piece of plastic for the window, one large solid piece of fabric for the back,
and 4 smaller pieces of fabric to 'frame' the plastic in the front.
Now for the sewing. I
have never sewn with this plastic sheeting stuff and here are some tips I
learned:
GO SLOW! I didn't
have any problems with my needle going through the plastic while sewing
slowly.
When pinning the plastic to the fabric place the pins
PARALLEL to the seam, not perpendicular like you'd normally do. This makes sure that you don’t have a hole in
the plastic that is visible outside the seam.
All my seams involving the plastic were sewn with the fabric
on the bottom. Even so, I still had to
use my hands to help feed them through the sewing machine. (You can see that my first attempt did bunch
up a little bit as I got the feel for how much help was needed).
Now to make the windowed panel for the toy bag.
First, I sewed the two side panels onto the plastic window.
Next, I added the top and bottom panels to complete the front
of the bag.
Then to help finish off the look of the 'window', and help
to further secure the plastic into the bag, I did one finishing seam all the
around the window. This will also hold
down the seams that we sewed in the first two steps so they don’t show through
the window.
Next, sew your two panels together on three sides to get a
simple bag.
Now for the opening at the top of the bag. Since part of my goal with this project is to
keep small toys away from our little one, I wasn't comfortable using a standard
draw string closure. I just know that
string would get pulled out by my oldest and we'd be back to dress up doll
parts all over the floor. So, I decided
to make a tight stretchy closure with a fully encased piece of elastic. My oldest can stretch it open to get out the
dress up dolls, but it's almost fully closed the rest of the time.
To make an enclosed elastic top you need to fold down the
top of the bag one inch and sew most of the way around. Leave a small opening so you can feed your
elastic through.
Next, feed the elastic all the way around the bag.
(Tip:
I always use a paper clip or safety pin like this to feed any elastic or
cording through a narrow casing. Such a
life saver!)
Find the right tightness for your bag and tie off the
elastic into a complete circle.
Tuck in the elastic and sew the remaining part of the seam closed.
Turn the bag right side out and stuff with toys! That’s all there is to it! In less than an hour you can have a fun toy
storage bag with a see through window!
You just have to find the time!
I AM LINKING TO AS MANY OF THESE PARTIES
AS POSSIBLE:
SUNDAY The DIY Showoff - Under the Table and Dreaming - Mad in Crafts - I Heart Naptime MONDAY Home Savvy A to Z - 1929 Charmer - Be Colorful - TheSouthern
Institute - DIY Home Sweet Home - Singing Three Little Birds
- Homemakeron a
Dime - Between
Naps on the Porch - Cottage
Instincts - It’s So Very Cheri
- Keeping it Simple - Making the World Cuter - Sumo’s Sweet Stuff - The Girl Creative - Sew Can Do - Skip to my Lou - Craft o Maniac - Trendy Tree House - BlueCricut Design
- TUESDAY Me and My Boys -
Home Stories A 2 Z - Bowl Full of Lemons - My Uncommon Slice of Suburbia
- Coastal Charm - Confessions of a SAHM - Homework - Vintage Wannabe - Strictly Homemade - A Soft Place to Land - Hope Studios - Today's Creative Blog - CSI Weekly Challenge - Creative Itch - I’m Topsy Turvy - Sugar Bee - All things Related - Letting the Creative Juices Flow
- Night Owl Crafting - Tip Junkie WEDNESDAY Momnivore'sDilemma - SouthernHospitality - YesterdayOn Tuesday - Blue Cricket
Design - Someday Crafts - Domestically Speaking - Sew Much Ado - Seven Thirty-Three - My Backyard Eden - Take it from Me THURSDAY SavedBy Love - The
ArtsyGirl Connection - MyCrazy Beautiful Life - DelightfulOrder - Fireflies and Jellybeans
- Somewhat Simple - The Shabby Chic Cottage - It’s Fun to Craft - The Train to Crazy - Craftastical - Treasures for Tots FRIDAY SassySites - French Country Cottage
- HappyHour Projects - Whipperberry - DesignerGarden
- Serenity
Now - Bacon Time -
The Crafty Nest - delicateCONSTRUCTION- Young& amp; Crafty - Lolly Jane - Remodelaholic
- 504 Main – Kojo Designs - Fingerprints on the Fridge – The Shabby Nest - Simply Designing – It’s a HodgePodge Life - J A Girl – Design it Chic – SATURDAY Tater Tots and Jell-O – Along for the Ride – Funky Junk - I Can't Stop Crafting


Great Idea!!
ReplyDeleteI would love for you to link this to my Flaunt It Friday link party at Blissful Bucket List. We also have a great giveaway this week! http://www.blissfulbucketlist.com/2012/06/flaunt-it-friday-2.html
Sarah@
www.blissfulbucketlist.com
Love this idea! Would be great for so many things: crayons, puzzle pieces, little fisher price people and animals and so much more. I really like that it keeps things together and out of the littlest sweetie's mouth. Great, great idea.
ReplyDelete