Blog Swap with Sumo's Sweet Stuff

Today is a very special day here at I Can Find The Time...my first blog swap!  And how lucky am I to be swapping with Summer from Sumo's Sweet Stuff?!?!  Crazy, I know!  She has such a great blog and is a real inspiration to me!  I hope you check out all her great projects!


Hello everyone!

I'm so excited to be guest posting over here today!

I'm Sumo, from Sumo's Sweet Stuff!


Sumo's Sweet Stuff

My real name is Summer, but my husband nicknamed me Sumo when we were dating. (Should I be offended?) Now he's got all of my family, as well as lots of our friends, calling me Sumo. I think Aunt Sumo sounds pretty great, don't you? I live in Utah with my husband, and our two beautiful daughters - Reece and Remi!


Growing up, I never used to be all that domestic or crafty, so I think no one is more surprised than my mom at how I've ended up where I am today! I started Sumo's Sweet Stuff last May as a place to keep some of my crafting projects so that my personal blog wasn't overrun with them. Somehow, that developed into a place to host giveaways, share tutorials, share recipes, and feature fellow bloggers' ideas and blogs! I also use my blog to promote my etsy shop, so if you're ever in the market for some baby girl accessories, come on over! Every Monday is Market Yourself Monday, where you can link up your latest projects, and visit other blogs to get some inspiration!
Sumo Sweet Stuff


Here's a little peek at some of the things you can find on my blog:


Three Tiered Shirts
T-Shirt Dress
Fabric/Elastic Headbands
You can find something every day of the week at Sumo's Sweet Stuff:

Market Yourself Monday
Tutorial Tuesday
Mouth-Watering Wednesday
Things to Try Thursday
Feature Friday
Showcase Saturday
Sponsor Sunday

I also am involved in a joint blogging venture - Win, Lose or Blog. If you aren't following already, you should get on over there and do so! We have a lot of great sponsors, and not all of the prizes donated are going to the contestants - they are also going to people who comment! Plus it's just nice to cheer for those lovely ladies. We're also starting to do some giveaways, so what's not to love? We'll be doing more seasons as well, so if you think you want to participate, you may get that chance in the future!

Thanks again for having me! I hope to see you all over at Sumo's Sweet Stuff soon!

How to make a Personalized Growth Chart

I am so happy to finally share with all of you one of my all time favorite projects.  This project is a big part of why I decided to start my own blog...it really made me feel like I had something unique and special to share with the world.  I want to show you how easy it can be to make a truly one of kind gift for your children....

a Growth Chart!
I used to love being measured as a child, and comparing the marks with my siblings and parents. Maybe it’s because we are all so tall (my sister and I are both 6’ tall), but I’m excited for my children to relive all those fun days we had with a pencil in the laundry room. There will be one major change though, this growth chart will be hung on the wall, and can be moved into a new house at any time. No more cutting out drywall, or worse: crying on moving day from leaving behind growth charts written right on the wall!
(Yes, you are seeing that correctly.  My 17 month old is already around 2' 9" tall!)

Since I finished this project before my blog existed I don't have a lot of good pictures to share with you of the step by step process, but I will sum it up here with any tips I learned along the way.

Supplies you'll need:
-a long and thin piece of wood.  I used an 11" x 48" piece of unfinished pine from the hardware store.  It was only about $7 and was lighter than the white finished shelving pieces I also considered.  Check out the scrap bin for even cheaper options.
-wood cutouts to spell your child's name (not required, you could always paint the letters on.  I got my 4" white letters from Michael's for $2 each)
-paint and brushes
-ribbon to hang it with
-other wood cutouts to match your theme (also not required)

The first step should be drilling the holes for the ribbon to hang the growth chart.  I did not do this until after Meredith's chart was painted and the drill caused a few splinters and the paint lifted off.  You definitely want to do this first!
There are an unlimited number of designs and patterns that you can use to paint your growth chart. Any google image search will give you lots of options for children's themes.  To paint the board, I needed three white base coats to cover the wood grain, and then two coats of blue for the sky. Next I added some simple green hills at the bottom, and some clouds at the top. A very simple background so the name and decorations will stand out.
For the letters, wanted a bright and eclectic look to her name, so I opted to paint each letter a different pattern using bright pinks and greens. This kept the look somewhat uniform, while adding a lot of charm and whimsy. And if you do a quick Google image search for painted wood letters you will get TONS of ideas on patterns and designs to paint on your letters.
(Can you tell how much I love Google images?) 
Here are some close ups of Meredith's letters...feel free to copy any of the patterns I used.

Once the letters are painted you can attach them to the background. I used a piece of blue painter’s tape to make sure the letters were straight and attached them using hot glue.
Once the letters are on, you can finish the rest of the chart. I added some 3-D flowers and butterflies painted to match the color scheme of the letters. These were less than a dollar from Michael's, and come in various shapes and sizes. I also painted one large flower right on the board.

When the background is all done, you’ll need to add the ‘ruler’ for the measurements. Since I am expecting my daughter to come in at least 6’ tall…I used 6’2” as the tallest height on the chart and went down from there. I only added numbers next to the foot increments, but you can label every inch if you’d like.

When the chart is all painted, spray it with a few coats of clear coat to seal the paint.

That's all there is too it!  One piece of wood and some paint and you can make a very special gift for a very special child in your life! 

You just have to find the time!
Pin It

How to turn anything into a Wristlet


I have a confession.  I am addicted to deals!

I have been on a 'Junking' bender these last few weeks to try to finish decorating this new house.  I am constantly on Craig's List looking for the perfect console table or arm chair.  I am in Goodwill every other Saturday hoping to score a deal during the 50% off sale. 

Side note, if you haven't been to Goodwill on the 50% off sale day it is an experience.  People are lined up before they open and it's a great way to get your "Black Friday" rush all year long.  LOVE IT!!

And since I'm usually scouring through racks of vases, or sorting through the mirrors stacked in the corner I have found that the big purses I adore are not working out so well.  Enter the wristet. 

I. Love. Wristlets! 

They are super functional and a great way to have everything you need with you and still use both hands to shop.  Genius.

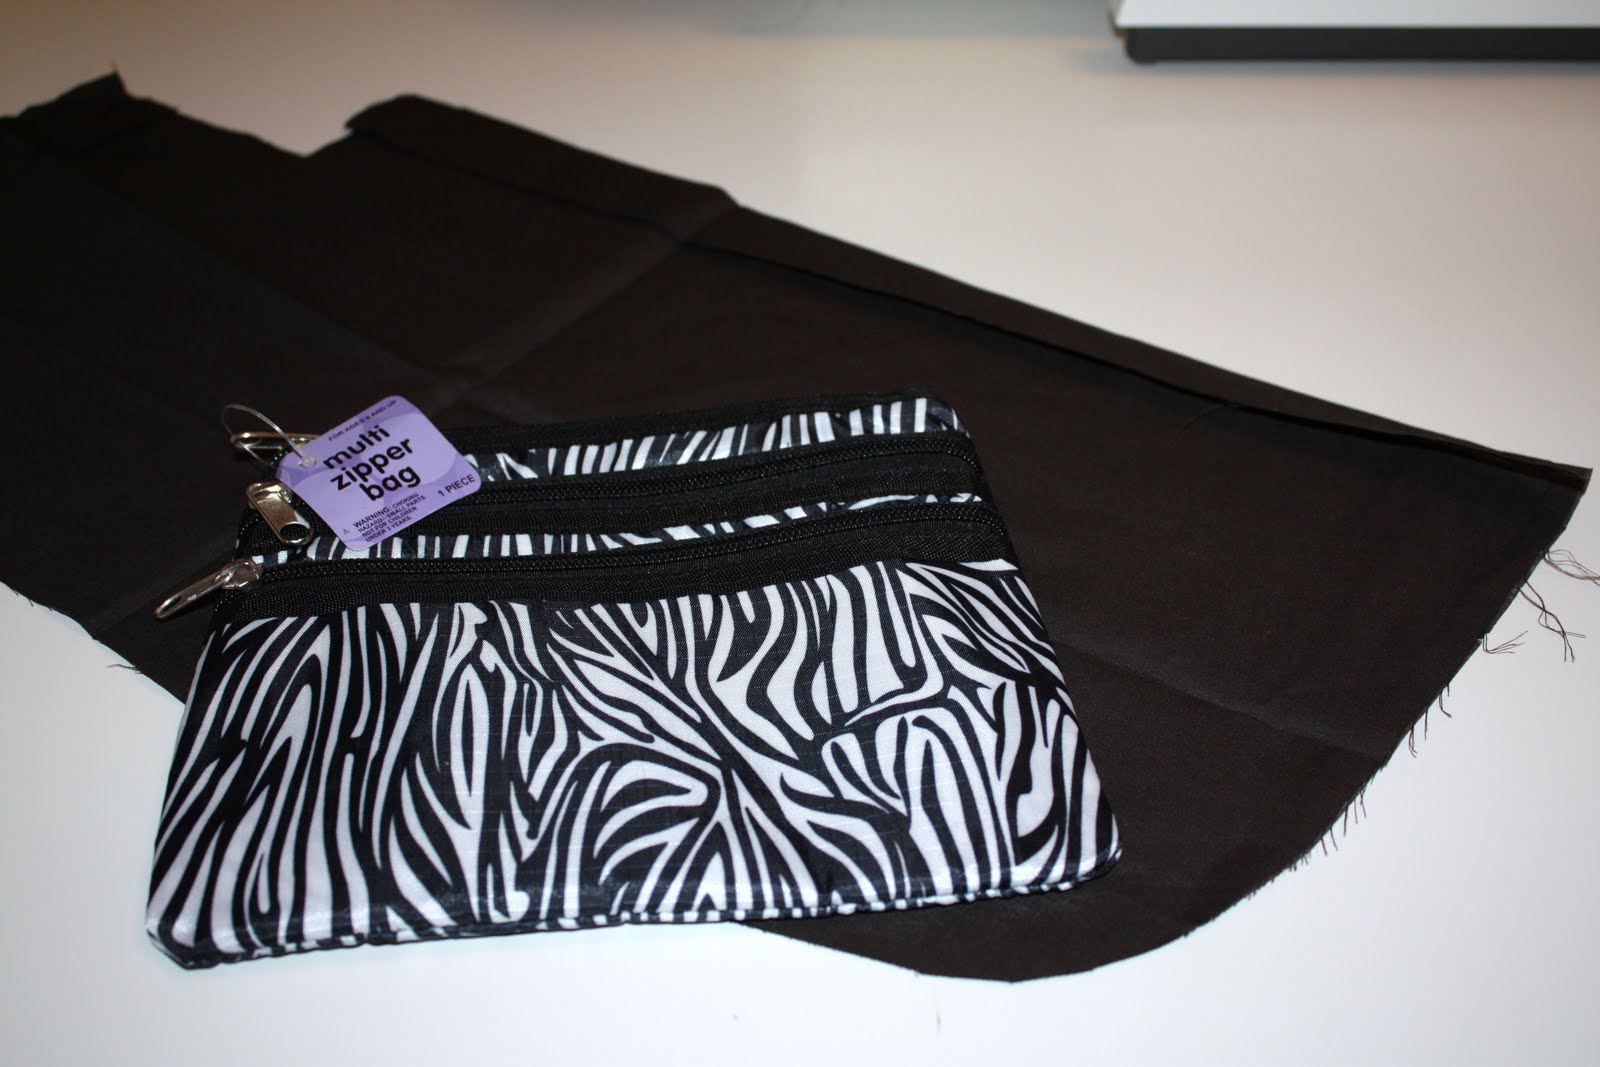
While shopping at my local Target I stumbled upon their back to school section and what would soon become my favorite wristlet.  This beauty is being sold as a "multi zipper bag", but I saw potential for so much more.  I love the larger than normal size, and the 3 individual compartments. 
All that for only $2.50?  SOLD!

So here is a quick tutorial for how you can turn any small pouch into a wrislet in no time!


Supplies you'll need:
-small pouch
-coordinating scrap fabric (around 5"x16")
-seam ripper
-sewing machine


First, cut your scrap fabric to measure 5" x 16" (or as close as possible).  Fold the fabric in thirds length-wise and iron.  Fold the piece into thirds again and iron again.  You should now have around a 1/2" x 16" strip of fabric. 


Sew the strip of fabric right down the center with a straight or decorative stitch.  You can also use contrasting thread for a little more unique design.

Now that the strap is done, you'll need to attach it to the bag.  I recommend adding your strap to a seam near the top of the bag.  I prefer to have my strap near the zipper pulls when the zippers are closed, but you can add it to either side. 


Turn the bag inside out and find the seam where you want to attach the strap.  Using your seam ripper, open up the seam in the bag to the width of your strap.  Thread your strap into the opening, and leave about 1/2" to 3/4" of the ends sticking out. 


Resew the side seam of the pouch with the strap in it.  It will probably be pretty thick, so some hand sewing may be necessary. 

Turn the bag right side out and there you have it.  A quick sewing project to turn the perfect zippered pouch into a functioning wristlet.


You could use this idea to turn any pencil case, small makeup bag, or even a homemade pouch into a great wristlet.

You just have to find the time to make it happen!
Related Posts with Thumbnails