Hand Towel Seat Belt Covers

Today's post is a great project that my sister thought up to help solve a very annoying problem...and I know you will all love it! 
Hi everyone, I'm Kathryn's sister, Stephanie, and I thought of making a seat belt cover from a hand towel that can help avoid getting your seat belt sweaty after a great workout (especially Bikram yoga!) or after getting caught in the rain.

Supplies you’ll need:
- 1 hand towel (makes two seat belt covers)
- 1 package of 36” sewable Velcro
- scissors
- thread
- sewing machine

Instructions:
So, I’m making two sets, one for me and one for friend I do yoga with. I bought two 2-packs of hand towels at Wal-mart for $3 each. I liked them since they had the corresponding stripes down each end and that is where I’ll make the cover. I like the use of hand towels since there are lots of nice, finished edges. I’ll be making two seat belt covers that are 16” long since I’m using the width of the small edge of the towel, along the stripes.  So that means I am only spending $1.50 in each set...what a great frugal gift idea!

First, cut the hand towel in half along the short length.
 
 
Cut each piece of Velcro in half, leaving approx. a 15” length.  Place one of the halves of the Velcro (I did the Velcro hook side first) towards the finished edge of each half of the towel.  I centered it on the width and just behind the finished edge, about 1” from the bottom of the towel.

Sew down the Velcro tape using a sewing machine.  I used white thread for the top thread and blue for the bobbin so that it was as hidden as possible.

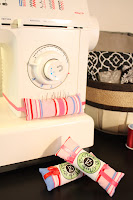
(Don't you love the Sewing Machine Pin Cushion she has on her machine?  If you'd like one click here)

For the next part, you need to choose the finished width of the cover that you’d like and sew the finished edge. Standard seat belts are 2” wide, so I was shooting for 2.5” to allow for seams on each fold later on.

Fold over the seat cover to the desired width to determine where you should trim the extra. I measured 2.5” from the final fold and marked it with a pin. I think I measured an additional 1” for seam allowance. The pins are in the picture at 2.5” and 3.5” pins. I did this on both ends and then cut off the raw edge at the second pin.

After trimming the raw edge, turn up the edge 0.5” twice and pin it in place.  Then, sew it in place to create a hem.  I switched the top thread to blue to hide the seams.

Then, place the second piece of Velcro tape (make sure it’s the opposite type!) just inside the seam you just sewed.  I placed mine as close as possible to the new seam and I folded it over to ensure that the Velcro parts line up to make a 2.5” wide tube.  The hem is pretty thick (3 thicknesses of terry cloth), so you’ll probably have to offset it a bit from the hem to allow you to sew around the Velcro tape.  Pin the Velcro tape and sew it down like the first strip.  I switched back to white as the top thread to hide the seams.

Finally, there is just one step left.  I decided to sew two extra seams on each cover to help stabilize the tri-fold of each cover.  I sewed in about 3/8” on each edge with a single straight seam so that the cover would always fold to the same place no matter how many times you put it on and take it off the seat belt.  This wouldn’t be possible if I hadn’t made it 2.5” wide in the first place. 

Once all your velcro is on and your folds are sewn your seat belt cover is all done!  Here are the two sets I made, one blue and one red.

Here are my new seat belt covers in action!


I hope you all like my sister's project...and that it will help all the exercisers out there protect those seat belts!
Pin It

Featured Projects

(Sorry I have not posted in for ever!  We were in St. Louis for a week over the Labor day holiday...and I came home to a killer cold.  I'm still a little under the weather...but I promise I will get back on ball soon!)

I wanted to post a special thank you to some of the amazing blogs out there that have featured my projects.

First, my Drum Light Shade was featured on:

504 Main
504 Main

Someday Crafts
Photobucket

And, my Pillowcase Shopping Tote was featured on:

Women Who Do It All

Thank you all SOOOOOOO much for featuring my projects!  It really gives me motivation to make more and more creative projects to share with the blogosphere!

Scrapbook paper 3D wall art

There are a lot of ideas out there on how to use scrapbook paper in the decor of a room.  I love that you can get some beautiful 12" x 12" pieces of artwork
{because let's be serious...some of those pages are closer
to art than craft supplies}
for less than a dollar!  And you can buy the pre-made collections of paper and have them already perfectly coordinated for your color scheme and style.  Love it!

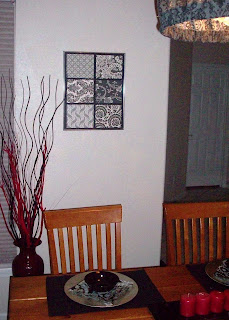
I found a lot of projects online with multiple pieces hung in a collection...but I wanted one final piece hung in a frame.  I found some good inspiration at some local stores {Hobby Lobby} and online...and here is what I made:


If you want to get the same look here are the steps I took
{sorry there aren't more pictures}:

Supplies you'll need:
-frame
-poster board (optional)
-foam core board
-paint (optional)
-scrapbook paper
-hot glue gun and glue stick

First, you'll need to decide how many panels you want and what size they will be.  My frame was 16" x 20", so I choose 6 panels that are 6" x 7".   Cut your paper and foam board to the same size and to the number of panels needed. 

Based on the color scheme of your papers, you might want to paint the edges of the foam board.  I wanted them to look like shadows, so I painted all the edges of my foam panels black.


Once the paint is dry, use the glue stick to attach the paper to the panels. 

I used black poster board as my background, so I cut it to 16" x 20" and put it in the frame.  You could also paint the cardboard that comes with the frame to get the right background color.


Now all you have to do is hot glue the panels onto the background and hang it up.  Super easy right?

With all the scrapbook papers out there the possibilities are endless!  Let those creative juices flow find the time to make some art!
Pin It

Studio 13 Giveaway

Hello Everyone!  I just had to write a quick post to let you know about the first giveaway from Studio 13!

{In case you don't know...I just started an Etsy shop with my mom
called Studio 13 and it rocks!}

I am an advertiser over on Clean Mama {LOVE. THIS. BLOG} and thought that doing a giveaway on this amazing blog would be a great way to kick off the store opening.

I hope you all hop on over to check out the giveaway and leave a comment to enter!

Good Luck!

How to Make a Drum Light Shade

I have a fun project today to share with all of you who are looking for a way to cover or hide a hideous light fixture. Since we are currently renting a house we are stuck with the old ugly shiny brass light fixtures that were here when we moved in. I know we can replace them easily enough…but it’s more work and expense than I want to tackle right now. We probably won’t be in this house past the year lease, so I need a DIY solution to beautify my dining room and cover the ugly ‘chandelier’.

So I did some internet shopping and decided my only hope was a drum light shade….but I’m too cheap to go buy one and recover it in the fabric I wanted. So here is my solution…a tutorial on how to make your own drum light fixture for less than $10!

Supplies you’ll need
-embroidery hoop (I used an 18” hoop from Joann’s for $5)

-fabric (I used a flat sheet I got from Goodwill for $2.50)
-ribbon or fishing line to hang it up
-large staple gun
-sewing machine & thread
-scissors

The first step is to alter the embroidery hoop. Once you know that the hoop is large enough to fit around the widest part of your light fixture, you will need to remove the two wooden blocks that are stapled to the outer hoop. There isn’t really a trick to getting these off, just go slow to make sure you don’t damage the hoop. These hoops are made with very light weight wood and will split pretty easily.

Once that blocks are removed from the outer hoop, you will need to make a cut the inner hoop. I used an Exacto knife and it took about 6 passes to get through the wood. Here is what your hoops should now look like.

To make the shade, you will need to cut a piece of fabric to fit your fixture. Measure how tall your light fixture is {making sure to cover all the ugliness!}, and measure the circumference of your hoops. This will give you the height and length of your piece of fabric. Add at least 4” to the height of your shade for seam allowances. If you want to have a gathered shade like I made you can make the length of your fabric anywhere from 1.5 to 2 times your hoop circumference. Once you have your final height and length, cut out a rectangle of fabric.

Fold and iron down 2” on the top and bottom of the long sides of the fabric. You will need to create a rod pocket at the top and bottom of the fabric for your embroidery hoops to go into. Measure the width of your hoops and add at least ¼” to make your rod pocket. The wood that these hoops are made out of will not slide easily against most fabrics, and a too small rod pocket will make it impossible to get the hoop through. {Trust me because I had to sew this seam 3 TIMES to get it right!}. Repeat these steps to make a second rod pocket on the bottom of the fabric.


Now you need to feed one hoop into each of the pockets to make the shade. I did both at the same time and inched them along to the end. The wood does not slide well against fabric, and it can take a little bit of tugging to get all the way around the hoops. I also had one side of the fabric cross the gaps in the hoops to help hold it all together. Once you have the fabric on the hoops in a way you like, use your staple gun to staple the two ends of the hoops back together. It is tricky to line them up perfectly for one staple to catch both ends of the hoops, but it’s the best way I could come up with to secure the wood hoops.

You should now have a finished drum shade…on to the installation. I used thin black satin ribbon to install my shade, but thicker ribbon or finishing line would also work. Using the staple gun, fire 4 staples into the inside of the top hoop of the shade (through the fabric). Make sure to get them right across from each other…it will help you get the shade hung up evenly. Loosen the staples just enough to thread the ribbon through and tie a piece of ribbon to two of the staples. Thread the ribbon through the chain on the light fixture and attach to the staple on the opposite side of the shade.


You could also use a much thicker ribbon and attach four pieces to the shade and create a large bow where they meet in the center. Or using fishing line to hide the installation and not draw away from the shade. Whatever works the best for your design.


Once the shade is hung up you might have to tweak it to get it level, but that’s all there is to it! A quick and cheap way to cover an ugly light fixture without making permanent changes. I’ve already got my eye on some other ugly lights in this house to cover up!

I hope this helps some of my fellow renters!

Pin It

200 Followers and a Grand Opening!

First of all, I have to stop and catch my breath…I have passed 200 followers! What?!?! That is so amazing! I am so glad that even one person out there likes my projects and wants to see more…let alone 204 of you! I am inspired every day by the super creative blogs I follow, and I am honored to add to this community in any way!

Now for the Grand Opening announcement…I would like to introduce everyone to Studio 13!


This Etsy shop is a long time in the making. My {super creative and talented} mom and I have wanted to get together and sell our projects for a long time. She used to sell at craft fairs and expos all the time when we were growing up, but this is our first venture into a digital storefront. We are still getting our inventory sorted out, and working on what products will go up for sale…but we are officially open for business! Here’s a sneak peak of what you can find at Studio 13:

Sewing Machine Pin Cushions

These little beauties are my pride and joy! A truly unique idea that has saved me so much stress while sewing! You will never have to deal with trying to find the best spot for your pins, and moving a pin cushion around your machine as you sew. With a Sewing Machine Pin Cushion tied to your machine your pins will be right by your side every step of the way!

Handmade Greeting Cards

{My mom is amazing!} She has made some of the most amazing custom greeting cards you will ever see! And for about half of what a greeting card costs from the big stores you can’t go wrong with one {or a dozen} of these beauties.

Wine Cork Trivets

This design is a favorite of mine, and would look great in anyone’s kitchen. No two trivets are the same, and are perfect for a wedding gift or hostess gift.

Felt Applique Pillows

These pillow slip covers are each hand cut and sewn for a truly unique look. All of the pillow slip covers are the standard 18' x 18" size so you can use them on your existing throw pillows for a quick decor update. And if you see a design you like, but want different colors, please don't hesitate to ask for a custom order!
We are also working on some baby/kid items and will have those listed soon!

I am really excited for this new adventure...and I hope you all like what you see!

Featured Projects


It was another exciting week for I Can Find The Time!  Three of my projects were featured on some really amazing blogs...


My DIY Matchbook Notepads were featured on
Photobucket

And my favorite project, the Growth Chart I made for my daughter, was featured on


And my quick tutorial on making a Shopping Tote from a Pillowcase was featured on


Thank you very much to all these great blogs for featuring my projects! 


Make a Large Shopping Tote from a Pillowcase


Here is a quick tutorial on how to re-purposed some of those old pillow cases into a large shopping tote.  

Or if you are like me and your regular sheets aren't the most fun fabrics head on over to Goodwill to look for bright and fun pillowcases to make into a large tote.

(Here's a tip: Sheets/pillowcases are really just huge pieces of fabric that can be used for tons of sewing projects.  Next time you see a bright colorful sheet set think about how it might look as drapes, or throw pillow, or even a custom shower curtain.  The possibilities are endless, and the price/yard is usually a great deal!)

Supplies you'll need:
- 1 pillow case (regular or queen)
-seam ripper
-scissors
- sewing machine

You'll start by ripping out both side seams and the end seam if necessary.  All the pillow cases I own are really just one piece of long fabric folded in half so there probably won't be a third seam at the bottom to rip out.

After the side seams are ripped out fold the fabric back in half and lay it flat on the table.  You will make two cuts here.  The first is to cut the fabric in half along the fold at the bottom. And a second cut diagonally through the rectangular pieces.  To do this you will need to cut diagonally from the lower right corner to the upper left corner. After both of these cuts are done you should have 4 right angle triangle shaped pieces of fabric.

Here is what the pieces will look like after one has been flipped upside down to show the shape of the tote.

Next step is to iron and sew a hem on the angled edge of all 4 pieces. 

Once the seam is done you will need to sew two of the triangles together in the layout above to form one side of the bag.  Sew along the angled edge, following your seam as a guide.  Repeat this step with the other 2 triangle pieces.  You can see where my pins are above to follow the seam.

Now you will need to sew the front and back of the bag together.  Line up each piece with the right sides together and sew the two side seams and the bottom seam to form the bag. 
Once the front and back are sewn together you can stop here, or add box pleat corners like I did.  Adding box pleats is super easy and I like the squared off look it gives this large tote.

To make box pleat corners you will need to sew one seam in each corner perpendicular to the seam that made the bottom of the bag.  The length of the seam is up to you, but I used 3" as my guide for this project. 
  

Once the box pleats are done all you need to do is turn the bag right side out and tie the two sides together for the strap. 


And that's all there is to it.  A few cuts and sewing a few seams and you have a reusable (and cute) large shopping tote.

I hope you can find the time to make one!

Pin It

Blog Swap with Sumo's Sweet Stuff

Today is a very special day here at I Can Find The Time...my first blog swap!  And how lucky am I to be swapping with Summer from Sumo's Sweet Stuff?!?!  Crazy, I know!  She has such a great blog and is a real inspiration to me!  I hope you check out all her great projects!


Hello everyone!

I'm so excited to be guest posting over here today!

I'm Sumo, from Sumo's Sweet Stuff!


Sumo's Sweet Stuff

My real name is Summer, but my husband nicknamed me Sumo when we were dating. (Should I be offended?) Now he's got all of my family, as well as lots of our friends, calling me Sumo. I think Aunt Sumo sounds pretty great, don't you? I live in Utah with my husband, and our two beautiful daughters - Reece and Remi!


Growing up, I never used to be all that domestic or crafty, so I think no one is more surprised than my mom at how I've ended up where I am today! I started Sumo's Sweet Stuff last May as a place to keep some of my crafting projects so that my personal blog wasn't overrun with them. Somehow, that developed into a place to host giveaways, share tutorials, share recipes, and feature fellow bloggers' ideas and blogs! I also use my blog to promote my etsy shop, so if you're ever in the market for some baby girl accessories, come on over! Every Monday is Market Yourself Monday, where you can link up your latest projects, and visit other blogs to get some inspiration!
Sumo Sweet Stuff


Here's a little peek at some of the things you can find on my blog:


Three Tiered Shirts
T-Shirt Dress
Fabric/Elastic Headbands
You can find something every day of the week at Sumo's Sweet Stuff:

Market Yourself Monday
Tutorial Tuesday
Mouth-Watering Wednesday
Things to Try Thursday
Feature Friday
Showcase Saturday
Sponsor Sunday

I also am involved in a joint blogging venture - Win, Lose or Blog. If you aren't following already, you should get on over there and do so! We have a lot of great sponsors, and not all of the prizes donated are going to the contestants - they are also going to people who comment! Plus it's just nice to cheer for those lovely ladies. We're also starting to do some giveaways, so what's not to love? We'll be doing more seasons as well, so if you think you want to participate, you may get that chance in the future!

Thanks again for having me! I hope to see you all over at Sumo's Sweet Stuff soon!
Related Posts with Thumbnails