Felt Placemat turns 3-D Wall Art

For about 6 months I was on the look out for anything butterfly related to hang in my oldest daughters' room.  I bought quite a few random items, and didn't really know how they would all work together to end up with the amazing "big girl" room I had for her in my head. 

One of the best items I found was these laser cut felt placemats for $2.
 
 Yes, only $2!  I was so excited!  They only had blue and green, but $2 for a 12" butterfly?!?!  I had to get them and figure out the details later.
I could have just slapped them up on the wall and called it a day, but I really wanted to do something to make them special and stand out in some way.
So, here is a quick tutorial for how I turned 2 plain felt placemats into
3-D butterflies for my daughters room!

Supplies you'll need:
Laser cut felt placemats
wire (plyable but stiff enough to support the placemat)
wire cutters
hot glue gun

First, measure and cut two lengths of wire for each placemat.  They should go almost all the way across the placemat about 1/4 of the way from the top and 1/4 of the way from the bottom.

Bend the wire into a slight curve where most of it will be hidden behind the placemat.  I didn't try to get the wire 100% hidden because the parts that are showing are super tiny anyways.  If your placemat has larger gaps it might be worth the time to bend the wire so its all the way hidden.

Using your hot glue gun place large drops of glue along the wire to secure it onto the placemat.  To avoid the glue drops from just spreading out wider and wider I found that if you make a drop the size you want, then build on it once its dried, you can add height without adding width.

Once all the glue drops are completely dried lay your butterfly half way off the table and bend the wires carefully in unison to get the placemat to become 3-D. 


Repeat with as many placemats as you have.
There you go, a super easy way to add a little something special to some $2 placemats for a girls wall art piece.

I have one more tutotial coming for the butterfly wall art in my daughters room, but here is a sneak peak of the placemats!  I love how her artwork turned out and can't wait to show you all!


Pin It

I AM LINKING TO AS MANY OF THESE PARTIES AS POSSIBLE:
SUNDAY The DIY Showoff - Under the Table and Dreaming - Mad in Crafts - I Heart Naptime MONDAY Home Savvy A to Z - 1929 Charmer - Be Colorful - TheSouthern Institute - DIY Home Sweet Home - Singing Three Little Birds - Homemakeron a Dime - Between Naps on the Porch - Cottage Instincts - It’s So Very Cheri - Keeping it Simple - Making the World Cuter - Sumo’s Sweet Stuff - The Girl Creative - Sew Can Do - Skip to my Lou - Craft o Maniac - Trendy Tree House - BlueCricut Design - TUESDAY Me and My Boys - Home Stories A 2 Z - Bowl Full of Lemons - My Uncommon Slice of Suburbia - Coastal Charm - Confessions of a SAHM - Homework - Vintage Wannabe - Strictly Homemade - A Soft Place to Land - Hope Studios - Today's Creative Blog - CSI Weekly Challenge - Creative Itch - I’m Topsy Turvy - Sugar Bee - All things Related - Letting the Creative Juices Flow - Night Owl Crafting - Tip Junkie WEDNESDAY Momnivore'sDilemma - SouthernHospitality - YesterdayOn Tuesday - Blue Cricket Design - Someday Crafts - Domestically Speaking - Sew Much Ado - Seven Thirty-Three - My Backyard Eden - Take it from Me THURSDAY SavedBy Love - The ArtsyGirl Connection - MyCrazy Beautiful Life - DelightfulOrder - Fireflies and Jellybeans - Somewhat Simple - The Shabby Chic Cottage - It’s Fun to Craft - The Train to Crazy - Craftastical - Treasures for Tots FRIDAY SassySites - French Country Cottage - HappyHour Projects - Whipperberry - DesignerGarden - Serenity Now - Bacon Time - The Crafty Nest - delicateCONSTRUCTION- Young& amp; Crafty - Lolly Jane - Remodelaholic - 504 MainKojo Designs - Fingerprints on the FridgeThe Shabby Nest - Simply DesigningIt’s a HodgePodge Life - J A GirlDesign it ChicSATURDAY Tater Tots and Jell-OAlong for the RideFunky Junk

Tissue Paper Decopauged Art Work

Since we are finally all settled in the new house I have been trying really hard to get the girls' rooms decorated.  My poor oldest daughter has never really had a decorated room.  We hung a few pictures in the rental house, but I just never could get too motivated to do anything else.  But now that we own again I am totally ready to give them both the special rooms they deserve.
As far as decorating goes, I am a huge fan of a few styles/items:
Monograms
(as you can see here: Wine Cork Monogram) 

Simple Silhouette/cut out designs
(as you can see here: Painted Mirrors - Felt Silhouette Pillows) 
Large personalized artwork
(as you can see here: Scrapbook Paper Artwork)
And for this project I combined all three of those things into my
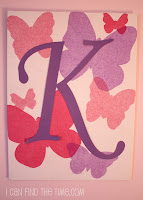
 Tissue Paper Decoupaged art work
Supplies you'll need:
blank canvas (any size or shape)
colored tissue paper
scissors
Elmer's glue & water or Modge Podge
Foam brushes

I snagged a three pack of flat canvases at Michael's with my 40% off coupon for this project so the art work could easily become the monogram for Meredith's room.  Bonus!

If you are going to make your own decoupage solution simply mix 1 part Elmer's glue with 1 part water.  It's cheaper than Modge Podge and works perfectly for this kind of project.
I prefer to do a background before my tissue paper silhouettes to help the art work look a little more finished and not just slapped down on the canvas.  I cut a bunch of 6"-10" squares out of a lighter color of tissue paper and decoupaged them on the canvas.  Make sure they overlap and that you cover the entire canvas with extra to wrap around the edges.  My tissue paper is very light pink and you can hardly see the color on the final project.  But, it does make a big difference in the texture of the art piece and helps you not see raw canvas between the silhouettes.

Now you need to cut out the silhouettes to be decoupaged onto the canvas.  I decided on 1 butterfly canvas and 2 flower canvases.  I made sure to cut out three different sizes of each pattern in three different colors of tissue paper.  I also laid them all out before I started attaching them to make sure I had a good looking balance of the colors and sizes.

Then it's just another round of decoupaging to get all the silhouettes in place.

TIP: Be very careful when decoupaging tissue paper,
because it will tear very easily!
Once they are all attached I did a final 'top coat' of decoupage to help seal the edges.

Depending on what you are making this art piece for you can stop there and have a great personalized piece of artwork. 

Since I wanted these canvases to be the monogram in my oldest daughters room I attached letters over the silhouettes.  (I am still undecided about the fonts I used so they are not decoupaged on yet...just stuck on temporarily)


I really like this project because it's super easy and can be modified a million different ways!  And with all the colors of tissue paper out there the options are endless!
You just have to find the time!

Pin It

I AM LINKING TO AS MANY OF THESE PARTIES AS POSSIBLE:
SUNDAY The DIY Showoff - Under the Table and Dreaming - Mad in Crafts - I Heart Naptime MONDAY Home Savvy A to Z - 1929 Charmer - Be Colorful - TheSouthern Institute - DIY Home Sweet Home - Singing Three Little Birds - Homemakeron a Dime - Between Naps on the Porch - Cottage Instincts - It’s So Very Cheri - Keeping it Simple - Making the World Cuter - Sumo’s Sweet Stuff - The Girl Creative - Sew Can Do - Skip to my Lou - Craft o Maniac - Trendy Tree House - BlueCricut Design - TUESDAY Me and My Boys - Home Stories A 2 Z - Bowl Full of Lemons - My Uncommon Slice of Suburbia - Coastal Charm - Confessions of a SAHM - Homework - Vintage Wannabe - Strictly Homemade - A Soft Place to Land - Hope Studios - Today's Creative Blog - CSI Weekly Challenge - Creative Itch - I’m Topsy Turvy - Sugar Bee - All things Related - Letting the Creative Juices Flow - Night Owl Crafting - Tip Junkie WEDNESDAY Momnivore'sDilemma - SouthernHospitality - YesterdayOn Tuesday - Blue Cricket Design - Someday Crafts - Domestically Speaking - Sew Much Ado - Seven Thirty-Three - My Backyard Eden - Take it from Me THURSDAY SavedBy Love - The ArtsyGirl Connection - MyCrazy Beautiful Life - DelightfulOrder - Fireflies and Jellybeans - Somewhat Simple - The Shabby Chic Cottage - It’s Fun to Craft - The Train to Crazy - Craftastical - Treasures for Tots FRIDAY SassySites - French Country Cottage - HappyHour Projects - Whipperberry - DesignerGarden - Serenity Now - Bacon Time - The Crafty Nest - delicateCONSTRUCTION- Young& amp; Crafty - Lolly Jane - Remodelaholic - 504 MainKojo Designs - Fingerprints on the FridgeThe Shabby Nest - Simply DesigningIt’s a HodgePodge Life - J A GirlDesign it ChicSATURDAY Tater Tots and Jell-OAlong for the RideFunky Junk

25th Hour To Do List

For this weekend's 25th Hour To Do List I'm going to focus on my master bedroom.  It always seems to be the most neglected, least 'decorated' room in my house.  And I'm on a mission to change that.  I got some great fabric at Joann's on Black Friday and the color palette is set.  Now to get all of this done...

Pinned Image

I really really really want a new black bed...but the ones I like are not cheap (which is exactly my budget since I just stopped working).  So I've been looking at these projects that use a wood door to create a new headboard.  I love that if you can find the right door you get lots of architectural details...which will look great when I paint it black.  Black furniture is a big part of this rooms revamp, which brings me to my next item...

Pinned Image

Once we get the new bed/headboard I want to try to paint the other pieces of furniture from our original bedroom set using this tutorial on Just a Girl.  If I can get my furniture to look like this dresser/buffet she repainted the we are in business!  And her tutorial is for us "I am lazy and hate to sand before I paint" people...even better!

{I just noticed that this post is from October 2009!  Where have I been!  I have tried and failed to paint a few pieces since then and wish I had found this post earlier!}

And finally, something a little easier that I can maybe even get done this weekend...PILLOWS!  I have never really had many pillows on my bed, but always wished I had more.  Here are some links to my favorites out there in DIY land:

Pinned Image

Pinned Image

Pinned Image
So there is my major Master Bedroom to do list...lets hope today has 25 hours so I can get some of it done!

Felt Silhouette Pillows

One of the easiest ways to change out the decor in a room is by making new throw pillows.  A bright fabric or design can make a plain tan couch the rooms focal point.  Or can add a temporary holiday theme without spending a ton of money. 

I decided to do just that with my plain tan couches by adding some new pillows.  I love the look of a bold silhouette design, and decided to use that style for my pillows.  I have some fleur-de-lis decor in my living room, so that's the bold design I decided on.

Now...how do I get a good fleur-de-lis cut out of felt?  I could try to free hand it, but we all know that will turn out...wonky!  So I began the clip art hunt.  I found quite a few options that would have been OK, but it was too hard to print the images in the size I wanted.  So I did some more exploring and remembered one of my favorite tips for finding silhouette images: wing ding fonts.
If you don't know what a wing ding font is...get ready because this is gonna change your crafting life!  Wing dings are fonts where each character is a picture, not a letter.  So when you type 'A', you get a smiley face, or a flower, or in my case an amazing fleur-de-lis!

And from my experience the best place to get free fonts is at www.dafont.com .  I don't get anything for saying that, they really are my favorite free font resource and have tons of wing ding fonts.
Once I downloaded and installed The French font I was ready to go. 
I printed out my favorite wing dings to make a pattern on plain paper.

I chose my favorite two for the pillows and cut them out of chocolate brown felt.  (I saved the other two patterns for other projects)


Now for the slow part...applique the felt cut out onto a 17" square piece of fabric that will be the front of your pillow.  Very slowly sew all the way around your cut out as close to the edge as possible.  Since felt does not unravel, you don't need to worry about finishing the edge.  

Once the applique is on, have two options to finish the pillow.  If you are going to want to change out your throw pillows, finish the back with an envelope closure or a zipper to allow for easy removal.  If this is a forever pillow you can stuff it and sew the whole edge shut.


And there you go...a few simple steps to get really special throw pillows to spice up your home decor.  And the best thing is that the possibilities for this project are unlimited.  You can make Felt Silhouette Pillows for every season and every room in your house. 
You just have to Find the Time!  :)

{Note: the Fleur-de-Lis pillows featured in this post are currently for sale in my Etsy shop: By Studio 13 along with other great gift ideas!}

Pin It


I AM LINKING TO AS MANY OF THESE PARTIES AS POSSIBLE:
SUNDAY The DIY Showoff  - Under the Table and Dreaming - Mad in Crafts  - I Heart Naptime   MONDAY  Home Savvy A to Z - 1929 Charmer - Be Colorful - TheSouthern Institute - DIY Home Sweet Home - Singing Three Little Birds - Homemakeron a Dime - Between Naps on the Porch - Cottage Instincts - It’s So Very Cheri - Keeping it Simple - Making the World Cuter - Sumo’s Sweet Stuff - The Girl Creative - Sew Can Do - Skip to my Lou - Craft o Maniac - Trendy Tree House - BlueCricut DesignTUESDAY Me and My Boys - Home Stories A 2 Z - Bowl Full of Lemons - My Uncommon Slice of Suburbia - Coastal Charm - Confessions of a SAHM - Homework - Vintage Wannabe - Strictly Homemade -  A Soft Place to Land - Hope Studios - Today's Creative Blog - CSI Weekly Challenge - Creative Itch - I’m Topsy Turvy - Sugar Bee - All things Related - Letting the Creative Juices Flow - Night Owl Crafting - Tip Junkie WEDNESDAY Momnivore'sDilemma - SouthernHospitality - YesterdayOn Tuesday - Blue Cricket Design Someday Crafts - Domestically Speaking - Sew Much Ado - Seven Thirty-Three - My Backyard Eden - Take it from Me THURSDAY SavedBy Love - The ArtsyGirl Connection - MyCrazy Beautiful Life - DelightfulOrder - Fireflies and Jellybeans - Somewhat Simple - The Shabby Chic Cottage - It’s Fun to Craft - The Train to Crazy - Craftastical  - Treasures for Tots  FRIDAY SassySitesFrench Country Cottage - HappyHour Projects - Whipperberry - DesignerGarden - Serenity Now - Bacon Time - The Crafty Nest - delicateCONSTRUCTION - Young & Crafty - Lolly Jane  Remodelaholic  - 504 MainKojo Designs - Fingerprints on the Fridge – The Shabby Nest - Simply Designing – It’s a HodgePodge Life - J A GirlDesign it Chic – SATURDAY Tater Tots and Jell-OAlong for the RideFunky Junk

By Studio 13 - Baseball String Bracelet with Monogram Charms

Just a quick post to let everyone know that I added a great new item to the shop today...

Baseball String Charm Bracelets!


It can be for a name, a school, a mascot...anything you'd like!  All Charms are sterling silver and are made in the USA. The are 1/2" tall and vary in width depending on the letter. Each charm is woven into the bracelet without a jump ring to ensure they don't fall off.

I currently have the following letters in stock and ready to ship:
A B C D E H J K L M N P R S T

And the best part is...this Baseball String Charm Bracelet is only $13!  That's right, for the price of lunch out you can have your very own personalized Baseball String Charm Bracelet!

I hope you all enjoy this update to my most popular item as much as I do!
Related Posts with Thumbnails